Fieldprint

Fieldprint (Virginia) Registration Instructions 

All DOE providers must register a new Fieldprint business account after Jan. 1, 2026. This is required to successfully send applicants for fingerprinting.

Who Can Register 

Any provider that sends applicants for a fingerprint-based criminal history check must register online with Fieldprint. 

What You Need Before You Start 

You will need your Fieldprint codes. 

If you do not know your facility id or Fieldprint codes, contact the Office of Background Investigations (OBI): 
Email: backgrounds@dss.virginia.gov 

Registration Website 

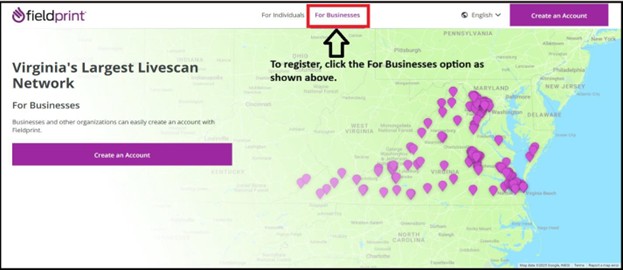
Use the Virginia Fieldprint business website: 
Website: https://fieldprintvirginia.com/businesses 

Step 1: Open the Website and Register

  • Go to the Fieldprint Website
  • Select Register For Businesses to begin. 
  • When asked to choose the Virginia agency, select: 
    VA Dept. of Social Service
screenshot of where to locate Fieldprint for Business
Screenshot of Fieldprint General Information

Step 2: Create Your Business Account 

You will be directed to create a registration page. 


Step 3: Select your agency and enter your fieldprint codes 

You will select the VA Dept. of Social Service for the Virginia Agency.

Screenshot to choose Fieldprint Virginia Agency


Screenshot of entering fieldprint codes

Then you will enter your facility Fieldprint codes

Reminder: If you need your codes, contact OBI: 
backgrounds@dss.virginia.gov 

Select Continue. 


Step 4: Enter your Primary and Secondary contact 

Enter the primary contact for the account. This should be the person who makes decisions for the provider.

Screenshot of Fieldprint content information


screenshot of Fieldprint create 2nd account option

Secondary contact (optional) 

You may add a second person to access the account. 

  • Select Yes to create a second account, or
  • Select No if you do not want a second user

Select Continue.


Step 5: Choose How Payment Will Work

Next, enter payment information for your account. 

screenshot of fieldprint payment page

Important Payment Notice

Once you choose a payment method, you cannot change it later.
This becomes the standard payment method for your Fieldprint account.

Payment Options
You must select one option.

Option 1: Applicant Pay
The person being fingerprinted pays for the background check.

Option 2: Provider Pay
The provider pays for all fingerprint-based background checks.
Payment information is required and will remain on file.

After entering payment information, select Continue.

Additional Note About Fees

For both payment options, the credit card on file may be charged for:

  • Cancellation fees
  • Rescheduling fees
  • No-show fees


Screenshot of fieldprint agreement download

Step 6: Review and Submit the Service Agreement 

  • Read the Service Agreement and instructions (they will download automatically). 
  • Select: I agree to the terms and conditions 
  • Enter your name. 
  • Select Submit Request. 

After submission, you will receive an email with your account login information. 

Provider Account Billing Note 

Fieldprint does not invoice most provider accounts unless special circumstances apply. 

If you believe you have a special situation (such as more than 1,000 applicants), contact Fieldprint directly to discuss your needs. 

How to Schedule a Fingerprinting Appointment (Applicants) 

Applicants must have the Fieldprint code and Facility ID from the provider before scheduling. 

Step 1

Visit the Individual Site 

Go to: Fieldprint Virginia (Individual) 
Select Schedule an Appointment. 

Screenshot of Fieldprint for Individuals

Step 2:

Sign In or Create an Account 

  • If you have used Fieldprint before, sign in to your existing account. 
  • If this is your first time, select Sign up and create an account. 

Step 3

Schedule the Appointment 

After logging in: 

  • Follow the instructions and enter the required information. 
  • Choose a fingerprinting location. 
  • Select the date and time. 
  • Complete the scheduling process. 

Step 4

What you need for your appointment 

At the end of the process, print your Confirmation Page. 

Bring the following to your appointment: 

  • Your Confirmation Page 
  • Two forms of identification 


What types of ID are accepted?